Sunday 26 August 2012

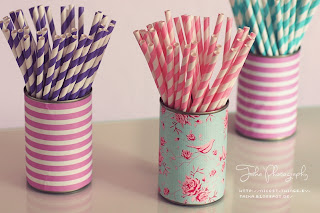
Scrapbook Tin Cans DIY

Ever since I saw this idea on Pinterest I knew it was something I had to find time to do. It was the perfect DIY to spruce up my work desk and stop using kitchen glasses to hold my stationary!
My Inspiration: Check her out, she has a beautiful blog :)

I had to wait for my family to use cans in the pantry to actually start the project which felt like forever. I was tempted to tip the contents out the cans but I managed to restrain myself for enough time to collect 3.

Begin with plain-Jane cans that have been thoroughly cleaned of their contents and labels (Soaking them in hot water for a few hours works great) and also grab:
- White Spray Paint 
- Scrabooking paper/ Fabric/ Anything to cover the cans witj
- Mod Podge
- Paint Brush
- Ribbon 
- Newspaper


Head outside into a well ventilated area and lay down newspaper onto a flat surface. Spray the insides of the cans with the spray paint. Only 10 minutes is needed to allow the paint to dry, after that, the rest of the project is done inside.

Measured out the heigh of the can leaving room for the top lip and if desired the bottom rim. (the length isn't too important, as long as it fits the circumference of the tin). Paint Mod Podge down the side of the can, stick the paper/fabric down and wrap it around sticking the overlap down with more Mod Podge cutting any off access material.

Use the same method with the ribbon around the base of the base can starting in the same place as the paper/fabric.

Repeat on as many cans as desired.

*notes*
I lightly dabbed glue about three extra times around the can to securely the paper and ribbon well.

Newspaper can be wrapped around the outside of the tin whilst spray painting to preserve the metal on the outside, if preferred.

Residual glue is left over after removing the can's labels so this is a great place to stick the overlap so to avoid any imperfections in the the wrap.


I'm stocked with the outcome and at how easy it was to make these. I'll bet my stationary is happy with their new homes as well :)

I bought spray paint especially for this project and can't wait to try it out on other DIYs so look out for those soon!

-Elle
x

Sunday 19 August 2012

Kuitpo Embers and Light Painting

Last night as I was fiddling with my little Canon camera at a friend's 18th, I discovered it has an adjustable shutter speed setting! I was so excited and immediately begun to test it out on our bonfire.

The little whirly embers that fly out of the fire is what I angled my lense towards. I started out on 1"(second) but didn't get much so I increased it slowly and each time it produced even better effects than the last. What made it a little tricker is that I was sitting on my boyfriend's lap the whole time, and he had the tendency to move around a bit. The longest setting was 15" and was definitely my favourite because the embers look like spun sugar! Here's my favourite shot:

15" // Embers from the Fire

After about 20 minutes of this I wanted to try more so, with some assistance from boyfriend, I attempted some light painting. Armed with a hot stick and my lovely tripod, I found a darker area in the forest and begun waving my stick around hoping it would turn out. For my first attempts they didn't look too bad:


15" Light Paintings


I know, they're a bit clique but it was a hippie party so it suits the theme ;)

I plan to refine my light painting skills and practice a lot. I'll use a tripod next time around to get even sharper results and try to get J (bf) to make some with me.

-Elle
x

Monday 13 August 2012

Getting Prepared For Summer

There's two weeks and six days until the first day of Spring, so close, yet so far away.

I'm so eager for Summer that I'm tempted to dress in my new summer clothes in the mornings, which would be disastrous since it's still soo cold! However, I don't think I'm fully equipped for the heat waves that undoubtably lie ahead. Which is why I've composed a Summer Shopping Wish-list, that will supply me with the gear for great lazy days on the beach.


Fresh new towels, a pair of thongs, bright lipsticks, denim shorts, sunscreen!,
something shady to sit under, white plimsoles.

The last on the list I've already purchased:


My new collection of nail polish, I won't be stopping at three colours though..

~

My main objective with this list is to spend the least amount of money possible as I'm suppose to be saving up. I already have my crochet bikini that I'm dying to try out, and it was only $30 from Valley Girl!

I've also got the most heavenly lip balm from a Sports Girls Accessories store, which has great cosmetic bargains.


I plan to lie on the beach and read when I'm not in the water and I assume that by Summer, I won't have finished the Fifity Shades Trilogy yet. Beyond those books I'm not sure what I'm going to read, some Sebastian Fitzek maybe or perhaps I could give Jane Austen a go. I'd love to tackle a biography but I know I'd have to find someone really interesting first.

Oh, and I plan on eating a lot of ice creams too, yum!

-Elle
x

Thursday 9 August 2012

Pink Shaded Birthday Cupcakes.

Yesterday was mum's birthday and I had the night off from work. It was the perfect day to finally bake something!  I chose a cake/cupcake technique from my Food and Recipe board, which has been all over Pinterest; colourful layers - very popular in the form of a rainbow.

I bought Betty Crocker Strawberry Cupcakes and used a very basic version of this technique and baked the layers together. After splitting the mixture into three portions, I gradually added pink food dye to only the second portions as the first was already a pale pink. The one issue I found with this technique is, the layers end up a little uneven. That being said, I would love to try a rainbow cake with individual layers soon!

I also bought some shiny aluminium wrapper to bake the cupcakes in but little did I realise the mixture already provides pink wrappers. Now I have extra and they looked really pretty together! Mum's favourite colour is pink so that's a bonus too.


The packets never come with enough icing to decorate all the cakes. Noted.

And the result..

Tada!


I've also got a DIY to post but I've gotta get to the shop before work.
-Elle
x


Friday 3 August 2012

Motivation and Desserts

Staying motivated isn't easy, even when it's something I want to do, unlike the Maths DIs in high school; Thank goodness they're over.. The blogs I've found over the last weeks have great advice on staying creative and inspired, and they've been really helpful, but I'd like some books that offer some advice to read whenever I need to get into my creative headspace. However, when I looked around locally I couldn't seem to find any creative self help books so I might try looking online, if anyone has any suggestions that would be fantastic. :)

Upon my search for these books I ended up purchasing some really pretty and insightful recipe books on desserts and macrons. I've never understood what a macron was until I bought the book and boy do they look tasty but difficult to master! If I try any recipes I'll definitely post them. I also bought some moisturisers that have the most delicious aromas that remind me when I was younger; I might be because they smell like strawberry custard.


I've been practicing my photographing skills since coming across some excellent information on Lighting Conditions, Aperture, ISO and Shutter Speed from bubblynaturecreations.com, which has help me understand their important roles in photographing and how to acheive great results every time. Thank you so much Rachel! :)
-Elle

Sunday 29 July 2012

Fancy Letters.

I love reading books that have those elaborate letters at the beginning of each chapter. Over the past few nights I've experimented with my own letters, keeping Johanna Basford's gorgeous designs in mind when getting stuck on detailing. Take a look, they were so much fun to do:

Fancy Letters.
-Elle

Candle Butterfly Lamp Shade.

A couple of weeks ago I manged to access an Interior Design subject on my Moodle that I was going to study (before unenrolling in the course) and in one attempt, I guessed the password! I didn't think it would actually work and I feel a little guilty..

Out of the three assignments for the semester, I was intrigued by two. The first task is to create a lamp shade out of recycled materials. I created a trial 'lamp shade' with black paper and hole punched it with butterflies and wrapped it around a drinking glass. It's somewhat recycled as I ripped the paper from a notebook and used a household glass ;)

A Candle sits in the middle of the glass so it's
not really a 'lamp shade' 

I'll soon post my next attempt at designing/creating a lamp shade and the second task  that intrugued me.
-Elle